How to Add Hydraulic Fluid to Excavator?
Hydraulic fluid is to an excavator what blood for people. It not just enables various parts to move as they should; it guarantees their effectiveness therefore ensuring lang service.
This guide will be useful to you if you own a powerful excavator such as AHM’s Mini Excavators. To get around with, in this article we are going to describe how to add hydraulic fluid to excavator, step by step.

How to Add Hydraulic Fluid to Excavator: A Step-by- step Guide
We advice that you to refer to the owner’s manual always. But generally, the process is almost the same for most models, as follows:
Step 1: Locate the Hydraulic Tank
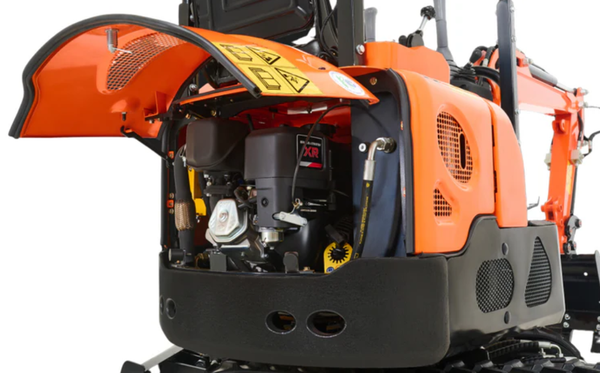
The hydraulic tank is usually found adjacent to or running along the sides of the chassis, although exact location may vary in some cases. In case you don’t know where yours is located, consult your manual on how to add hydraulic fluid to excavator
Step 2: How to Check Hydraulic Fluid Level
After finding the tank, there are two way to check hydraulic fluid: use the sight gauge or the dipstick. These will help you determine the levels of hydraulic fluid in the tank. The level should fall within the minimum maximum fill lines.
Your goal is to always fill your mini excavator hydraulic fluid until it’s between the maximum and minimum lines. In caso it falls short of the minimum point, it means you need to top it up.
Step 3: Prepare the Werk Area
Check that your excavator is not on a slope of any kind. The parking brake should be engaged, and the vehicle should be situated on plain terrain. Additionally, safety is first in place; hence, be sure that the engine is switched off and completely cold if it was run previously.
Step 4: Check Fluid Quality
But before just topping it off, it’s crucial to check the condition of the existing hydraulic oil. Does it look discolored, murky, or contain particles of debris? If so, you likely have some contaminated oil issues rather than just low levels.
In that case, you’ll want to drain and do a full fluid flush instead of risking pushing those contaminants further through the hydraulic circuit.
Step 5: Open the Hydraulic Tank Carefully
Carefully remove the fill cap or any breather components to access the tank. This is an excellent opportunity to give another confirming glance at your oil levels using that sight gauge or dipstick.

Step 6: Add the Recommended Hydraulic Fluid for Excavator
Only use the hydraulic fluid for mini excavator specified by your manufacturer for your particular machine. Using an off-brand mini excavator hydraulic oil or improper substitutes is Just asking for performance issues and premature hydraulic failures.
Carefully pour your new, correct excavator hydraulic fluid into the tank. Be careful not to overfill past the maximum line. Use a funnel to help avoid any potential spills or messes.
Step 7: Replace the Fill Cap
Once the fluid level is correct, securely replace the fill cap or any other components you removed earlier.
Step 8: Start the Engine and Check for Leaks
After applying your new fluid, reseal every component and cap you removed or anything that is visible. The next step is to start the engine and let it idle for a few minutes. One must remain alert during this phase!
Carefully inspect all hydraulic hosing, lines, fittings, and components to identify any external leaks. Besides, you do not want your new fluid to leak before it even gets in there to do its thing.
Step 9: Operate the Hydraulic Components
With the engine still running, briefly cycle through all your excavator’s hydraulic functions – boom, arm, bucket, etc. This helps fully circulate that fresh fluid throughout the entire system.
Stop 10: Chook the Find Lovol Aftor Oporation
After you’ve completed your cycling, shut off the engine. Your excavator will need 15-20 minutes to cool back down fully before you can take an accurate fluid level reading.
Once your machine has had sufficient time to cool, make your way back over to the sight gauge or dipstick. Due to the hydraulic components being active during the cycling process, you may notice the fluid level has dropped somewhat. Do not worry- this is normal.
Carefully top up the reservoir by adding additional fluid until you once again reach the proper level between the minimum and maximum markers.

Why You Should Use the Right Mini Excavater Hydraulic Fluid?
Now, we know what some of you may be thinking: “Can’t I just use that cheaper store-brand hydraulic fluid instead of the expensive name-brand recommended by the manufacturer?”
While we respect your thrifty tendencies, allow us to rebut that line of thinking. Using anything other than the specified hydraulic oil is essentially signing your excavator’s death warrant slowly but surely.
These machines are precisely engineered systems whose components are designed and calibrated to operate with those factory-recommended fluids. Introducing substitutes or off- brand alternatives is just asking for hydraulic issues.
Increased heat, wear, oxidation, sludge buildup, etc.-these are all issues that using improper fluid will inevitably invite.
Conclusion
Maintaining the proper hydraulic fluid level in your excavator is crucial for ensuring its efficient operation and longevity. Follow the proper processes to the letter. And only use the recommended fluids and lubricants as specified.
Do that, and your digging excavator will be hard at work for many years. Stray from that path of excellence, and you’ll be replacing components a lot sooner than your manufacturer predicts.
The choice, as always, is yours. But hopefully, this guide on how to add hydraulic fluid to excavator has shown how to properly top up and maintain your hydraulic fluids.
If you’re interested in high-quality mini excavators, please explore AHM mini excavator neue. Our compact yet powerful excavators are designed with robust hydraulic systems and cary maintenance access. That means how to check hydraulic oil level on excavator is easy so that you can be back to work in no time.
